I still remember the day I unpacked my Ninja Creami. I'd seen so many enthusiastic videos about this kitchen appliance that I'd finally fallen for it. The box contained the machine, several pots with lids, and a recipe booklet that promised wonders. But frankly, at first, I didn't really understand how it could transform a frozen base into creamy ice cream.
Spoiler: this machine has completely changed the way I make frozen desserts at home. Now I couldn't do without it. The Ninja Creami isn't a classic ice cream maker, it's something completely different, and that's exactly what makes it so special. The technology it uses to transform a frozen block into the perfect creamy texture is just fascinating.
What surprised me most was how easy it was to use. Despite its sophisticated technology, the machine is really easy to use. You prepare your base, freeze it, and the machine does all the work. You don't need to be a pastry chef or ice cream expert to get a result worthy of an artisanal ice cream maker.
How Ninja Creami works
Technology that changes everything
The Ninja Creami works on a completely different principle to traditional ice cream makers. Instead of simultaneously stirring and cooling your mixture as a conventional ice-cream maker would, the Creami uses a two-step method that makes all the difference.
First step: you prepare your liquid base with all the ingredients you fancy. It could be a mixture of milk and cream for a classic ice cream, yogurt for a frozen yogurt, blended fruit for a sorbet, or even a protein mix for a healthy milkshake. You pour all this into one of the jars supplied with the machine, and head for the freezer for at least 24 hours. This is the recommended time for optimal freezing.
Second step, and this is where the magic happens: once your pot is completely frozen, you place it in the machine. The motor is really powerful, and powers a special blade that will literally grate and transform your frozen block. This blade gradually descends into the pot as it rotates at high speed, creating an incredibly smooth and creamy texture. The freezing process has created ice crystals, and the Creami's blade will pulverize them to get that creamy texture we all love.
What really happens in the bowl
The Creamify technology, as Ninja calls the process, is truly impressive to behold. When I launched my first program, I was stunned. The noise of the motor is certainly present enough (the noise level is not negligible), but to see this concrete-hard block transformed into creamy ice cream in just a few minutes, it's just magic.
The paddle has a flat bottom and special blades that literally shave your frozen mixture. It doesn't just blend like a conventional mixer, it cuts and pulverizes the ice crystals to create an ultra-fine consistency. This is what makes the texture so smooth, almost like Italian gelato. No excessive fat, just the right mechanical movement.
The outer bowl holds everything in place while the paddle does its work inside the pot. It's an ingenious system that guarantees even processing of the entire preparation. The machine stops automatically when the program is complete, and you're left with the perfect frozen dessert.
The different Ninja Creami models
The classic NC300EU
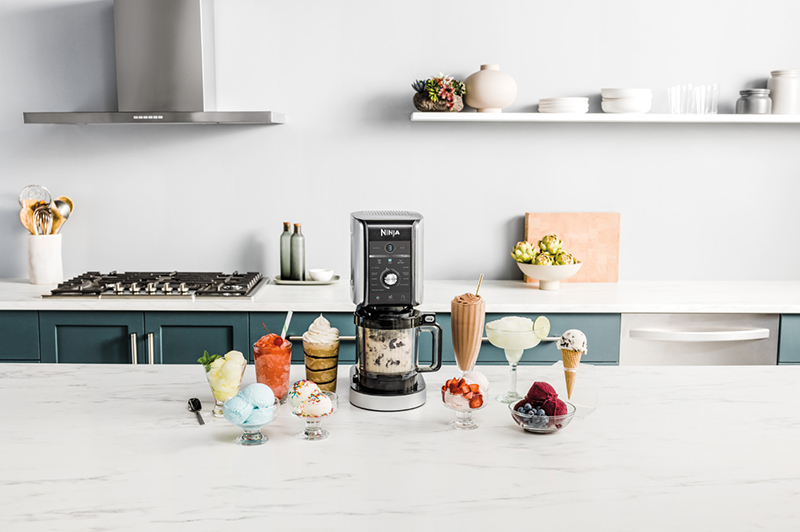
I started with the Ninja Creami NC300EU, the basic model which is already really complete. This machine contains seven different programs that cover a wide variety of frozen desserts. You've got the classics like ice cream and sorbet, but also more original options like milkshake, smoothie bowl or even light ice cream for those who are careful about their diet.
This model comes with three jars, which is really practical. You can prepare several flavors in advance and have them ready in your freezer. When you're craving ice cream, you just take out a jar, put it in the machine, and in a few minutes it's ready. This has become my Sunday routine: I prepare three different bases and freeze them for the week.
The product is fairly compact for a kitchen appliance of this power. It doesn't take up a huge amount of space on the worktop, although I have to admit it's not tiny either. But considering what it does, I think it's more than worth it.
Ninja Creami Deluxe, the improved version
After using my classic model for several months, I finally fell for the Ninja Creami Deluxe. This top-of-the-range model offers even more possibilities. It has bigger pots, which is great when you want to prepare for several people or just really crave ice cream.
The Deluxe also offers additional programs and a few extra features. The Creami Swirl function, for example, lets you add toppings like chocolate chips, fruit pieces or caramel directly into your ice cream during the process. It's really cool for creating more elaborate flavors effortlessly.
The great advantage of the Deluxe model is that it comes with more accessories. You have more pots, so you can always have several flavors ready to process. For someone like me, who loves experimenting with different recipes, this is a real plus.
Essential programs and how to use them
Ice Cream, the classic program
The Ice Cream program is the one I use most. It's the simplest way to make traditional creamy ice cream. You prepare a base with cream, milk, sugar and vanilla extract or any other flavoring of your choice. The basic recipe is really easy: mix all your ingredients, pour into a jar, freeze for 24 hours, then run the program.
The great thing about this program is that it adapts to different types of preparation. Whether you're making an ultra gourmet chocolate ice cream or a lighter version with almond milk, the result is always creamy. The motor automatically adjusts the processing time to obtain the perfect texture.
My favorite recipe? Classic vanilla ice cream with real vanilla beans. It tastes so much better than store-bought ice cream. And by using quality ingredients, you get a product that really has nothing to do with what you find in the supermarket.
Sorbet, for fruit lovers
The Sorbet program is perfect for people who want to avoid animal products or just prefer something lighter. You can create an incredibly creamy mango sorbet, a strawberry sorbet that tastes like summer, or any fruit puree you fancy.
The key to a good sorbet is to have the right proportion of water and sugar. Fruit already contains liquid, but you need a little sugar or honey to prevent it from becoming too hard in the freezer. The recipe booklet supplied with the machine provides a good basis for getting started, and then you can adjust it to suit your preferences.
What I love about Ninja Creami sorbets is that the texture is really creamy, almost like gelato. It's not grainy or icy like some sorbets can be. The paddle really does an incredible job of pulverizing all the crystals and creating something smooth.
Gelato, for purists
The Gelato program creates an even denser, creamier texture than classic ice cream. It's my favorite program when I really want to indulge myself. Gelato generally contains less fat than American ice cream, but is served at a slightly higher temperature, which gives it that incomparable melting texture.
For a successful gelato, I use a base with more milk than cream, unlike classic ice cream. It's lighter but still ultra-creamy. My coffee gelato has become legendary among my friends. I prepare a mixture of whole milk, fresh cream, sugar and strong espresso, and the result is just crazy.
Alternative programs
Beyond traditional ice cream, the Ninja Creami offers truly versatile programs. Milkshake mode transforms your base into a thick, creamy drink, perfect for gourmands. The Smoothie Bowl program is ideal for a healthy breakfast, with frozen fruit and yoghurt transformed into a thick bowl to top with your favorite toppings.
The Light Ice Cream program uses a slightly different speed and time to achieve a creamy texture even with low-fat preparations. It's perfect if you're watching your diet but don't want to sacrifice the pleasure of a good ice cream. I tested it with Greek yoghurt and natural sweeteners, and frankly, it's delicious.
How to prepare your bases like a pro
The essential ingredients for a successful ice cream
After months of experimentation, I've come to understand that the quality of your ice cream depends 80% on your base. If your liquid preparation isn't right, even the best machine in the world won't work miracles. For a classic creamy ice cream, I always use a mixture of whole liquid cream and whole milk. This combination gives the best balance between creaminess and lightness.
Sugar is also an essential ingredient, and not just for taste. It plays an important role in texture, preventing the formation of large ice crystals. If you use too little sugar, your ice cream will be hard and icy. Too much sugar, and it won't harden enough in the freezer. The recipes in the booklet supplied with Creami give good basic proportions, and over time you'll learn to adjust them to suit your tastes.
For sorbets, fresh fruit purée really makes the difference. I buy my fruit at the market when it's in season, blend it and freeze several jars at a time. In winter, I always have a stash of mango or strawberry sorbet to remind me of summer. You can also use frozen fruit, which is practical and often cheaper.
Proportions that work
For a standard ice cream, I usually follow this base: two cups of liquid cream, one cup of whole milk, three-quarters of a cup of sugar, and a teaspoon of vanilla extract. It gives the perfect texture every time. If you want something lighter, you can replace some of the cream with milk, but be careful not to go below 10% total fat, or the result will be too icy.
For a sorbet, the formula I use is simple: two cups of fruit purée, half a cup of water, and between a third and half a cup of sugar, depending on the fruit. Acidic fruits like strawberries need more sugar, while naturally sweet fruits like mango need less. Honey also works well to give an interesting taste.
Protein milkshake mixes require a different approach. I often use a plant-based drink as a base, add a scoop or two of protein powder, and mix with fruit or cocoa. The result is a cold, creamy drink that has nothing to do with the usual protein shakes.
Freezing time crucial to success
The golden rule with Ninja Creami: 24 hours minimum freezing time. I've tried cheating several times, telling myself that 12 or 15 hours would be enough, and each time I've regretted it. If your jar isn't completely frozen, the paddle can't do its job properly. You end up with a liquid texture or pieces that aren't fully processed.
The best time to prepare your bases is in the evening, after dinner. You put them in the freezer before going to bed, and the next night they're ready. I've got into the habit of always having two or three jars in the freezer. That way, when a craving strikes, I don't have to wait 24 hours. It's really the trick that changes everything.
Be careful to respect the fill line indicated on the jars. If you put in too much liquid, it will overflow during the transformation process. Too little, and the paddle won't be able to create an even texture across the entire height. The MAX line is there for a reason - never go over it.
Tips I've learned over the years
The Re-Spin function, your secret ally
Here's a feature I didn't immediately understand, but which has become indispensable. Sometimes, after the first cycle, your ice cream doesn't have exactly the texture you want. It may be a little too hard, or have a few small residual crystals. That's where the Re-Spin function comes in.
You simply restart the program a second time, and the paddle will work the mixture again to achieve an even smoother consistency. I always use the Re-Spin for my Greek yoghurt-based ice creams, which tend to be denser. After the second pass, the texture becomes absolutely perfect, almost like an artisanal Italian gelato.
The other time Re-Spin comes in handy is when you've left your jar in the freezer longer than you intended. If it's been three or four days, the mixture will be really hard. The first cycle will transform it, but a second run will refine the texture and make it even creamier.
Adding mix-ins at the right time
At first, I added my chocolate chips, cookie pieces or fruit directly into the liquid base before freezing. Big mistake. These items become rock-hard in the freezer and the paddle risks pulverizing them completely or, worse, getting damaged.
The best way is to use the Mix-In function after the main cycle. Once your ice cream has been processed, you add your toppings to the jar, and start the Mix-In program, which will just stir gently to incorporate your additions without destroying them. Your chocolate chips stay crunchy, your cookie pieces keep their texture, it's perfect.
My favorite mix-in? Dark chocolate chunks and roasted almonds in a vanilla base. Or brownie pieces in chocolate ice cream. With the Deluxe and its Creami Swirl function, you can even make ribbons of caramel or fruit coulis - it's just incredible.
The trick to creamier ice cream
If you find that your ice cream isn't creamy enough even after a full cycle, here's my secret tip: add a tablespoon of milk or cream directly into the pot after the first cycle, mix quickly with a spoon, and re-spin. This little addition of liquid enables the paddle to work the mixture better, creating an even smoother texture.
This technique works particularly well with low-fat preparations. The slight addition of liquid compensates for the lack of fat and gives a much more satisfying texture. I use it systematically for my protein ice creams or sorbets, which tend to be harder.
Care and cleaning of Ninja Creami
Cleaning is easier than it looks
I have to admit that, at first, I was worried that cleaning would be complicated. A device with a high-speed spinning blade seemed difficult to clean. But in reality, it's really easy to clean and maintain. The pots, lids and paddle are dishwasher-safe, which really does make a difference.
After each use, I quickly rinse the jar with warm water to remove any residue. If your ice cream was particularly rich or sweet, a quick rinse in soapy water will suffice. The blade is easy to clean by running it under water, and the blades don't really retain any residue. For the outer bowl and body of the machine, a damp sponge will do the trick.
The only point to remember is to dry the blade thoroughly before storing it. If it remains damp, you risk a little oxidation over time. I let it air-dry on my drainer, and once it's completely dry, I put it away with the device.
Keeping your Creami in good condition
A few simple precautions are all you need to keep your machine running optimally over the long term. Never overload the pots beyond the indicated line, as this could strain the motor. Check the blade regularly for damage, especially after processing particularly hard preparations.
Every two or three months, I do a more thorough cleaning. I dismantle the blade completely to clean every part, check that nothing has jammed in the mechanism, and make sure that everything turns freely. Regular maintenance ensures that you'll have a machine that lasts over time and continues to make perfect ice cream.
Beginner's mistakes I've made
Do not respect freezing times
My very first mistake with the Creami was to try and go too fast. I'd prepared a base in the morning, put it in the freezer when I left for work, and by the time I got home in the evening, I'd decided that 10 hours would be more than enough. The result was a half-frozen mixture that the paddle couldn't process properly. I ended up with a sort of liquid slush, not at all the creamy texture I'd hoped for.
Now, I religiously respect the 24-hour time limit. That's how long it takes for the whole jar to be completely frozen, right down to the center. If you're in a hurry, put your freezer on the coldest setting, but never go below 20 hours. This is really the absolute minimum for a good result.
Use preparations that are too liquid
At first, I tried to make sorbets with just fruit juice and a little sugar. The result was disappointing, too icy and not creamy enough. I've come to realize that you need a certain thickness in your base for the transformation to work properly. Sorbets need fruit pulp, not just juice. Ice cream needs cream or at least whole milk.
Now, when I prepare a base, I always make sure it's already a little thick before freezing. For smoothie bowls, I use plump fruit or Greek yoghurt. For milkshakes, I add a banana to add creaminess. These little touches really make all the difference to the final result.
Forget to clean immediately after use
The first few times, I left my pot with the leftover ice cream to warm up on the counter while I ate. Mistake. Once melted, ice cream becomes sticky and much harder to clean. Now, as soon as I've transferred my ice cream to a storage container, I immediately rinse the pot with lukewarm water. It takes 30 seconds and saves a lot of clean-up later.
The same goes for the blade: don't let it dry out with residue on it. A quick rinse right after use, and it's clean. If you wait, dairy or fruit residues can become really stubborn to remove.
Recipes every beginner should try
Classic vanilla ice cream, for starters
If this is your first time using the Ninja Creami, start with a simple vanilla ice cream. This is the basic recipe that will get you up and running without any headaches. Mix two cups of liquid cream, one cup of whole milk, three quarters of a cup of sugar, and a teaspoon of vanilla extract. Pour into a jar, freeze for 24 hours, and start the Ice Cream program.
This recipe works every time. The result is a creamy, smooth ice cream with an authentic vanilla taste. Once you've mastered this base, you can add melted chocolate, caramel, different extracts... The possibilities are truly endless.
What I like to do is prepare a large quantity of this vanilla base and divide it between several jars. In each, I add a different flavor: chocolate in one, coffee in another, strawberry in the third. That way, I always have a variety of flavors ready in my freezer.
Mango sorbet, for fruit lovers
My favorite sorbet is definitely the mango sorbet. It's so simple and the result is incredible. You take two nice, ripe mangoes, peel them and cut them into pieces. Blend them with half a cup of water and a third of a cup of sugar until you get a smooth purée. Freeze for 24 hours.
The next day, you run the Sorbet program and you get an incredibly creamy tropical delight. It's refreshing, it's healthy, and it's nothing like commercial sorbets, which are often overly sweet and artificial. With fresh fruit, the taste is just authentic and powerful.
You can do the same with strawberries, raspberries, peaches... Any fruit can be transformed into a delicious sorbet with Creami. My tip? Add a little lemon juice to the base to enhance the flavours. It really brings out the flavor of the fruit.
Protein smoothie bowls for athletes
For those who pay attention to their diet or love gourmet but healthy breakfasts, the Ninja Creami smoothie bowl is great. My favorite recipe: one cup of frozen fruit (I often mix banana and berries), one cup of plain Greek yogurt, one scoop of vanilla protein powder, and a little honey.
Once frozen and run through the Smoothie Bowl program, you get an ultra-thick texture that you can top with granola, fresh fruit, chia seeds, or whatever you like. It's much more satisfying than a classic liquid smoothie, and it really sets you up for the whole morning.
What I love about this preparation is that it's rich in protein without having that weird powdery taste you often find in shakers. Creami turns everything into a creamy texture that looks like ice cream, but is actually a balanced breakfast. Perfect after a workout.
Where to buy Ninja Creami and at what price
The initial price and where to find the best deals
The Ninja Creami represents quite an investment, I'm not going to lie to you. The classic NC300EU model can usually be found for around 200 to 250 euros, depending on promotions. The Ninja Creami Deluxe is a little higher, in the 300-350 euro range. This is a current price, which may vary according to site and time of year.
My advice? Keep an eye on sites like Amazon during sales periods or Black Friday. I bought my first Creami with a 30% discount, which made it much more affordable. Some sites also offer free delivery over a certain amount, which is always good to take into account the weight of the device.
Before you buy, I really recommend that you read the reviews and tests of other users. Feedback from people who use the device on a daily basis will help you make your choice between the classic model and the Deluxe. For someone who's just starting out and wants to test things out, the basic model is more than enough.
Delivery charges and payment options
Most online sites offer reasonable delivery charges, and some like Amazon even offer free delivery for Prime members. Given that the device still weighs several kilos, it's nice not to have to carry it from a store.
For payment, you generally have all the classic options: credit card, PayPal, and sometimes payment in instalments. Some sites also accept Visa and American Express. If you're still unsure about which model to choose, some merchants offer a free 30-day return policy, so you can try it out risk-free.
Additional accessories worth your while
Extra pots are a must
If you plan to use your Creami regularly (and believe me, you will), investing in extra jars is a really good idea. The jars supplied with the machine are handy, but if you want to have several flavors ready in your freezer at all times, you'll need more.
I bought an extra set of four jars after a few months of use, and it completely changed my organization. Now I always have six or seven different flavors ready. When friends drop by unexpectedly, I can offer them a veritable buffet of homemade ice creams. It's become a sort of signature for me.
The Ninja Creami pots are well designed, with airtight lids that prevent freezer odors from penetrating your preparation. This is an important detail, because nothing is more unpleasant than vanilla ice cream that has taken on the taste of fish from the freezer.
The advanced recipe book
In addition to the basic booklet that comes with the machine, Ninja also offers a more comprehensive recipe book with original creations. You'll find more elaborate recipes, advanced techniques, and plenty of ideas for using your Creami for more than just ice cream.
Personally, I've also learned a lot by following user groups online and on social networks. There's a real community of Ninja Creami enthusiasts who share their own recipes and tips. It's a mine of inspiration to try new things and discover flavors you'd never have thought of.
Questions I get asked all the time
Can the Ninja Creami replace a traditional ice cream maker?
Completely. In fact, I'd go so far as to say it's better than a conventional ice cream maker. With an ice cream maker, you're limited by preparation time and often have to add salt and ice. With the Creami, you prepare your base whenever you want, freeze it, and transform it in just a few minutes. In my opinion, the texture is even better, creamier and smoother.
How long does Ninja Creami last?
Once processed, your ice cream will keep in the freezer like any other homemade ice cream, for about one or two weeks. On the other hand, if you leave your unprocessed frozen jar in the freezer, you can keep it for several weeks without any problem. In fact, it's a good idea to keep a few jars on hand at all times.
Is it really noisy?
I'm not going to lie to you, the noise level is quite high during the cycle. The motor is powerful and the blade rotates at high speed, which makes a lot of noise. It lasts between two and three minutes, depending on the program. It's not unbearable, but it's not quiet either. If you have sensitive neighbors, you might want to avoid making your ice cream at 11pm.
Can you make sugar-free preparations?
Yes, you can use sweeteners or make preparations without sugar at all, but beware: sugar plays a role in texture. Without sugar, your ice cream will be harder and more icy. There are specific sweeteners for ice cream that give better results than conventional sugar for people who need to watch their blood sugar levels.
Is Creami suitable for special diets?
Absolutely. In fact, that's one of its great advantages. You can make vegan ice creams with almond or oat milk, protein ice creams for athletes, sorbets without any fat or animal products, lactose-free preparations... You control 100% of the ingredients, so you can adapt to any diet.
My conclusion on Ninja Creami
After several months of intensive use of my Ninja Creami, I can tell you that this machine has really changed the way I consume frozen desserts. I no longer buy ice creams from the supermarket, I make everything myself. It tastes better, it's healthier because I control the ingredients, and above all, it's so satisfying to create your own recipes.
The way Creami works is brilliant: this technology, which transforms a frozen block into a creamy texture in just a few minutes, is truly magical. Once you understand the basic principle (prepare, freeze, transform), everything becomes simple. The programs are well thought-out, the appliance is easy to use, and maintenance is straightforward.
What I like most is the creative freedom it offers. You want an ice cream with a special taste that you can't find anywhere else? You create it. Want to control exactly what you eat? You can. Want to impress your guests with original flavors? Creami makes it easy.
The only negative point is really the initial price, which may seem high. But if you like ice cream and frozen desserts, it's an investment that quickly pays for itself. When you compare the cost of a tub of store-bought artisanal ice cream (often 6 to 8 euros) with what you can make at home for just a few euros, you quickly realize that the appliance pays for itself in just a few months.
Don't hesitate to get started with simple recipes. Classic vanilla ice cream or a fruit sorbet are perfect bases for understanding how the machine works. Then you can experiment with more daring creations. The official Ninja website regularly features new recipes, and the online community is very active in sharing ideas.
Bon appétit and enjoy your ice creations!
Leave a comment 💬